Dependabot (2 Part Series)
- 1I have to tell you about Dependabot 🤖
- 2How to run dependabot locally on your projects
Dependabot is a fantastically useful tool provided by GitHub to monitor security vulnerabilities in your project's dependencies.
It can be used to automatically create Issues and Pull requests on your projects for security fixes and library updates, which is a great way to keep your project's dependencies up to date.
Since I published my initial article, one questions I get asked fairly regularly by readers and folks on twitter is: what do I have to do to run Dependabot locally? To be honest, this is not something I had ever considered - and for a while I didn't think it was something you could do. It turns out I was wrong! Running dependabot locally will let you create a custom security management system to automate Pull Requests and Issues for your project's dependencies.
How to run dependabot locally on your projects
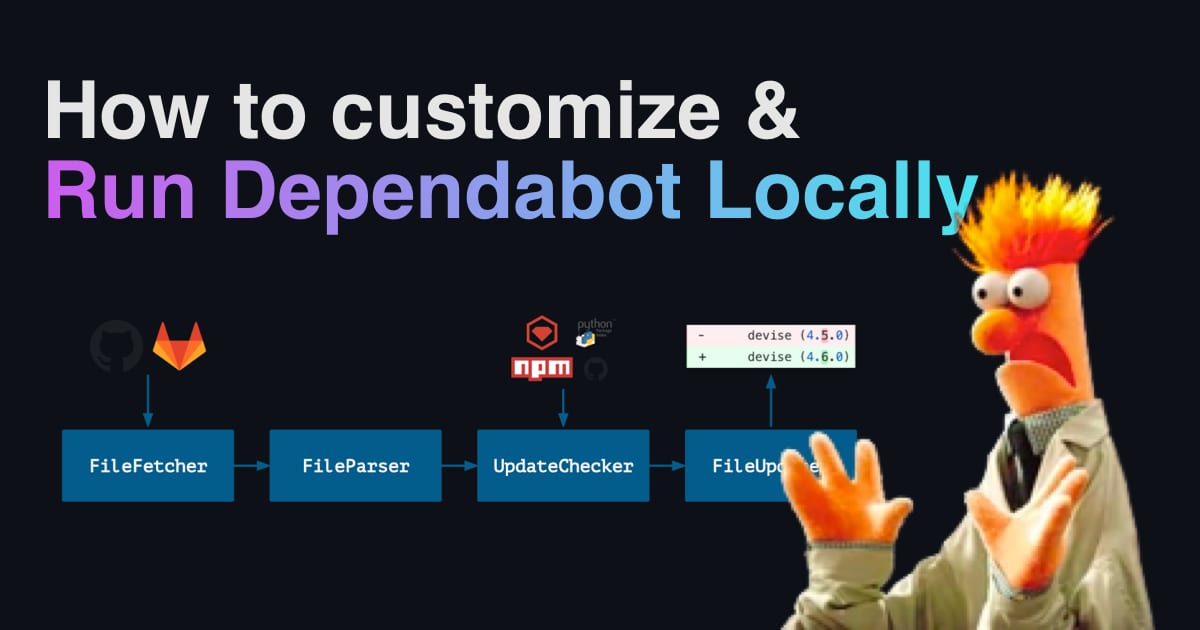
If you're working on a software development project that has needs which aren't met by Dependabot's built-in automation, you'll be happy to hear that you can customize your dependency automation with Dependabot Core and Dependabot Script. They're designed to be used together to allow you to set up your own Dependabot automations, with options for interactive and non-interactive workflows.
- Dependabot Core contains the main logic that is used to create PRs and Issues with Dependabot. This is where the bulk of the brains for Dependabot's automation is contained, and it's what you'll be using to create your own automation. You will also find Dependabot's public issue tracker within this repo, so if you find yourself running into challenges, you can open an issue there, or search through existing threads to see if anyone else has already run into the same problem as you.
- Dependabot Script is a library which contains sample scripts that use Dependabot core. It's a helpful illustration of how to use Dependabot's core to create dependency update automations which suit your needs.
Setup
- To get started, clone the dependabot-script repo, with
git clone https://github.com/dependabot/dependabot-script.git - Install the repo's dependencies with
rbenv install(which sets up the correct version of Ruby), followed bybundle install(which installs the rest of the dependencies)
Configure Dependabot Helpers
From here, steps will vary depending on the particulars of your project. There are helpers provided for dependabot-core for Terraform, Python, Go Dep, Go Modules, Elixir, PHP, and JavaScript. The install steps for each of these vary slightly - you should check the Readme for dependabot-script for details.
Familiarize yourself with the default script
Once you're set up, you'll want to look at update-script.rb - this contains a fairly generic setup to test for dependencies with dependabot-core. You will need to modify this file to suit your needs.
Look for the following lines to customize and set up your credentials:
1# GitHub credentials with write permission to the repo you want to update2# (so that you can create a new branch, commit and pull request).3# If using a private registry it's also possible to add details of that here.4credentials =5[{6"type" => "git_source",7"host" => "github.com",8"username" => "x-access-token",9"password" => "a-github-access-token"10}]
Next, specify the name of your repo, the language you want Dependabot to check for updated libraries and security vulnerabilities, and the package manager you use:
1# Name of the dependency you'd like to update. (Alternatively, you could easily2# modify this script to loop through all the dependencies returned by3# `parser.parse`.)4dependency_name = "rails"56# Name of the package manager you'd like to do the update for. Options are:7# - bundler8# - pip (includes pipenv)9# - npm_and_yarn10# - maven11# - gradle12# - cargo13# - hex14# - composer15# - nuget16# - dep17# - go_modules18# - elm19# - submodules20# - docker21# - terraform22package_manager = "npm_and_yarn"23
Run the script
You've done all the work needed to run the script, and generate a round of automated updates via PR. Run dependabot-core with your newly customized script with:
1bundle exec irb
Follow any prompts on the CLI, and you've done it! Note that there are a couple other ways you might run Dependabot locally, but this is the easiest way to get started. You can check out the other options in the README.md for more details.
Now customize it!
Once you've got the base script running, check out the docs for dependabot-core to see how to customize it further. For example, you may want to use FileParser to list all dependencies for your projects, to keep an eye on changes to OSS Licenses. You might use MetadataFinder to look up which of your dependencies are looking for sponsors, so that you can help fund the tools that keep your software running.
What will you use Dependabot for?
From here, the sky's the limit! If you're someone who is customizing dependabot for a specific need, I'd love to hear what you're doing. Feel free to drop me a line on twitter @irreverentmike - I'd love to hear about your project!
More reading
- GitHub provides a ton of other features and functionality to manage security in your software. You can read more at github.com/features/security
- As mentioned above, this is a follow-up to my initial article, a primer on Dependabot. Feel free to give that a look!